Entities
As you know from Basic concepts: ECS, you do not define entities in XML. You do define prefabs. Therefore, all partial samples on this page should be treated as parts of a relevant prefab definition.
Please refer to Prefabs for comprehensive samples.
An entity can be renderable or non-renderable. Most of playable entities are, of course, renderable, meaning the engine rendering system has to draw something on the screen to show to a player. Examples of non-renderable entities: internal debug container (with flags as components), internal game counters (FPS), the camera, – everything which is naturally not bound to the map and doesn't get involved in the gameplay directly.
Among renderable entities, Penal Engineer distinguishes between Tile Entities, which occupy grid cells, and Edge Entities, which are placed on the edges between two adjacent tiles (such as walls, doors, and windows).
You already know from the previous page that in Penal Engineer the map is a grid of tiles, and every tile is of 128×128 points.
Tile Entities
Opposite to Edge Entities (see the next section), Tile Entities are those which occupy tiles. Examples:
- Bed
- Toilet
- Table
- Chair
- Prisoner
Required parameters for definition
- Size on map
- Attachments
- Sprite
- UI toolbox icon (32×32)
Size
Size of a Tile Entity can be defined in points or in tiles. You can even mix both systems for different dimensions:
<Size>
    <Width Unit="tile">
        <Exact Value="2" />
    </Width>
    <Height Unit="point">
        <Exact Value="128" />
    </Height>
</Size>
Penal Engineer allows you to provide entities with sizes not snapped to tile boundaries (e.g. of 99 points length). But as the gameplay is tied to tiles, we strongly advise to refrain from using this capability. It's reserved for possible future unbinding from the tile system and allowing true free-forming of a prison.
Tall entities
A Tiled Entity can occupy more than 1 floor. Examples:
- Staircase
- Lift
To build such an entity, a player should have prepared an appropriate floors span.
Such "tall entity" can be defined with an additional parameter of Size which is named Tallness and presents alongside
with Width and Height:
<Size>
    <Width Unit="tile">
        <Exact Value="2" />
    </Width>
    <Height Unit="tile">
        <Exact Value="1" />
    </Height>
    <!-- Tallness is optional. Default: exactly 1 floor -->
    <Tallness Unit="floor">
        <Exact Value="2" />
    </Tallness>
</Size>
The above sample defined a Tiled Entity of a fixed tallness of 2 floors.
The words Width and Height relate to 2D dimensions of an entity, as drawn on screen, like if there would be no
multi-level in game. It's the standard terminology used in many 2D engines with "view from the top" model.
To designate the vertical axis (invisible to a player, orthogonal to the screen), the term Tallness has been chosen.
Please do not confuse Height (which stands for the "screen height" or "real world depth") and Tallness (which is
measured in floors and stands for "real world height").
But objects like staircases and lifts are naturally not of fixed tallness. Penal Engineer allows for dynamic tallness as well:
<Size>
    <Width Unit="tile">
        <Exact Value="1" />
    </Width>
    <Height Unit="tile">
        <Exact Value="1" />
    </Height>
    <Tallness Unit="floor">
        <Range Min="2" Max="unbounded" />
    </Tallness>
</Size>
The above sample may designate, for instance, a lift.
<Exact> and <Range> tags are mutually exclusive. You cannot specify both on a same dimension.
Penal Engineer does not currently support ranges for Width and Height, but only for Tallness.
Sprite
Every Tiled Entity must define a sprite. Sprite dimensions should match the entity size.
For example, if you craft a new bunk and want it to take up 1×2 tiles (128×256 points), you should supply a sprite of 128×256 pixels.
See the next page to know about sprites, textures, and how the Penal Engineer rendering system handles scaling.
UI icon
Same as the entity sprite, but of 32×32 pixels and for UI toolbox. You may specify the same sprite as for the entity if it looks good.
Attachments
You can specify that your entity must be attached to other entities or a floor slab from below or above.
For example, you want to supply a safebox placed under an office desk. Suppose an office desk takes 3×1 tiles, and you want a safe to be put only at any side but not at the middle of the desk. Additionally, you want it to be mounted against a capital wall. Then you could write:
<Attachments>
    <AttachToEntity>
        <NamespacedId Value="MainContent/OfficeDesk" />
        <AllowedPlacements>
            <AllowedPlacement>
                <Relation Value="under" /> <!-- enforce ordering of entities on the floor -->
                <Position>
                    <X Unit="tile">
                        <Exact Value="1" /> <!-- one side of the desk -->
                    </X>
                    <Y Unit="tile">
                        <Exact Value="1" />
                    </Y>
                </Position>
            </AllowedPlacement>
            <AllowedPlacement>
                <Relation Value="under" />
                <Position>
                    <X Unit="tile">
                        <Exact Value="3" /> <!-- another side of the desk -->
                    </X>
                    <Y Unit="tile">
                        <Exact Value="1" />
                    </Y>
                </Position>
            </AllowedPlacement>
        </AllowedPlacements>
    </AttachToEntity>
    <AttachToEntity>
        <!-- Instead of specifying a concrete wall entity ID, we specify a set of criteria -->
        <HavingComponents>
            <ComponentCriteria>
                <Id Value="WallTag" />
            </ComponentCriteria>
            <ComponentCriteria>
                <Id Value="IsCapital" />
                <FieldsCriteria>
                    <FieldCriterion Name="Value" Match="true" />
                </FieldsCriteria>
            </ComponentCriteria>
        </HavingComponents>
        <AllowedPlacements>
            <AllowedPlacement>
                <Relation Value="aside" />
                <!-- We could specify 4 allowed relative <Position>-s.
                     But <Distance> is way more efficient here. -->
                <Distance>
                    <Value Unit="tile">
                        <Exact Value="0" /> <!-- immediately next to a wall -->
                    </Value>
                </Distance>
            </AllowedPlacement>
        </AllowedPlacements>
    </AttachToEntity>
</Attachments>
Another example: a chandelier hanging from a ceiling and blocking a player to remove the floor slab.
<Attachments>
    <AttachToFloorSlab>
        <Floor Force="false" /> <!-- Default is "true" -->
        <Ceiling Force="true" /> <!-- Default is "false" -->
    </AttachToFloorSlab>
</Attachments>
Floor Tiles
Every floor slab (i.e. a tile) comprises exactly one entity: a so-called Floor Tile. Floor Tiles define a coverage material visible to a player, as well as various gameplay parameters (like walking speed factor).
Every tile in a Tile Stack is ultimately assigned with one Floor Tile entity.
Floor Tiles are inherently Tile Entities. However, the following parameters are ignored on them:
-
Size
Floor Tiles are always of 1×1 tile.
-
Attachments
Obviously, Floor Tiles cannot be attached to anything but the floor slab to which they belong. (But other entities can be attached to floor slabs.)
Examples of a Floor Tile:
- Dirt
- Grass
- Concrete
Edge Entities
These are entities having completely different topology, namely they are placed in between map tiles. Examples:
- Walls
- Doors
- Windows
- Custom entities which must/can be aligned by a wall (e.g. a bookshelf, a picture)
Unlike Tile Entities, Edge Entities cannot specify their sizes. They are 1D, not 3D, and are always inherently of 1 tile length.
An important observation is that Edge Entities are naturally to be placed along the edges of Tile Stacks, i.e. along the orthogonal axis to the screen. That said, such entities are assumed to be "flat" and facing towards characters inside the game world, not towards a player who oversees the world from the high sky.
If Penal Engineer would apply the same rendering logic to Edge Entities as to Tile ones, all Edge Entities would have to be rendered as a plain line (slightly varying in color only) rotated by 90° for vertical edges. But instead Penal Engineer adheres to a more complex rendering logic for Edge Entities.
Required parameters for definition
- Sprites
- UI toolbox icon (32×32)
Edge Entities cannot be attached and cannot span across floors, unlike Tile Entities.
Sprites
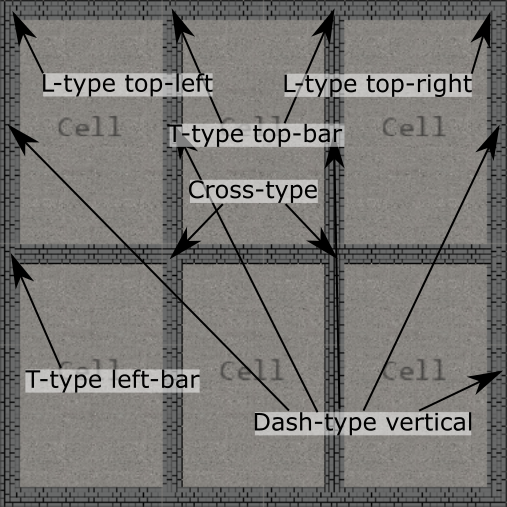
For each Edge Entity, you have to provide up to 17 sprites outlined below:
- body horizontal (96×32)
- body vertical (32×96)
- cap left (32×32)
- cap right (32×32)
- cap top (32×32)
- cap bottom (32×32)
- junction dash-type horizonal (32×32)
- junction dash-type vertical (32×32)
- junction L-type top-left (32×32)
- junction L-type top-right (32×32)
- junction L-type bottom-right (32×32)
- junction L-type bottom-left (32×32)
- junction T-type "top bar" connecting wall segments from left, right and bottom (32×32)
- junction T-type "right bar" connecting wall segments from top, bottom and left (32×32)
- junction T-type "bottom bar" connecting wall segments from left, right and top (32×32)
- junction T-type "left bar" connecting wall segments from top, bottom and right (32×32)
- junction cross-type connecting all 4 wall segments from top, bottom, left and right (32×32)
Seems scary? Don't worry, it's only to give most possible control and flexibility for truly complicated graphics, if you wish. Drawing all 17 textures is absolutely not necessary. In most cases, 5-6 are enough if you rely upon the Penal Engineer engine built-in sprite rotation capability:
- Wall body (horizontal & vertical covered by a single texture, just rotated by the engine)
- Wall cap (left, right, top and bottom)
- Wall junction dash-type (horizonal & vertical; for simpler arts even cap may suffice for dash-type junction as well)
- Wall junction L-type (rotation by the engine covers all variations)
- Wall junction T-type (rotation by the engine covers all variations)
- Wall junction cross-type
No one forces you to draw all 5 textures immediately to get visuals. You can point out any existing texture for any purpose the engine expects. So, you can start with drawing one body texture 96×32 and one 32×32 to use for all other sprites of your wall entity for a time being.
See the next page to know about sprites, textures, and how the Penal Engineer rendering system handles scaling.
You can safely omit defining of any sprite you don't want to get rendered. For example, for windows or doors you probably don't want the engine to render special junction sprites at corners, so you can skip defining L- and T- and cross-type sprites. In most cases you'd like to drop caps and junctions as well, keeping focused on body 96×32 only.
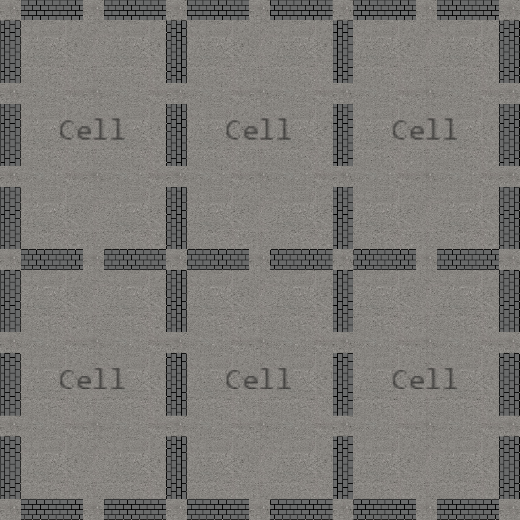
If you opt out of some sprites, the engine will not substitute them or stretch anything to fill the gap. There will be just gaps in rendering in place of missing sprite definitions. For walls, it looks pretty ugly:
But for doors and windows it's probably exactly what you want: to skip rendering them over wall corners/junctions.
UI icon
Same as for Tile Entity.
Key differences to Prison Architect
- In Prison Architect entities are 2D. In Penal Engineer they have the (optional) 3rd dimension
Tallness. - In Prison Architect walls occupy tiles. In Penal Engineer they don't.
- In Prison Architect entities can be required to be attached to walls only. Penal Engineer allows for much more flexibility, in particular allowing to define an anchoring entity capabilities (like "must be a capital wall" in a sample above), not a concrete entity ID.